


DARS Planner Student User Guide
Get Started
Navigate to DARS
Navigate to DARS
Go to myHumboldt
Click on DARS.

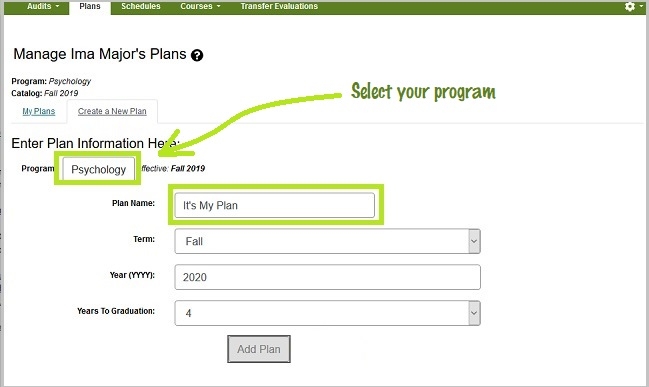
Create a plan
Create a plan
Once in DARS, click on the Plans from the top toolbar.
From the Manage Plans page, you can create a new plan or edit an existing one.
To create a new plan, click Create a New Plan.

- Select the program you want to plan for.
- Give your plan a name.
- Select a starting term and year
- Select the number of years for your plan (default is 4 years)
- Click Add Plan.
Add courses to build your plan
Add courses to build your plan
You should now be in Plan Builder. This is where you will add courses to your new plan. The default view will show your audit on the left and the plan on the right. You can add courses manually or by dragging them from the audit.
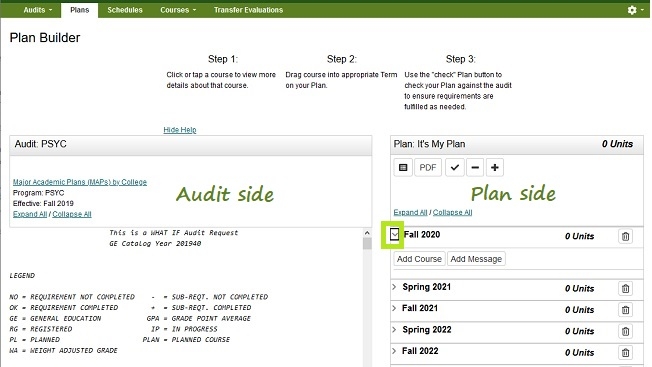
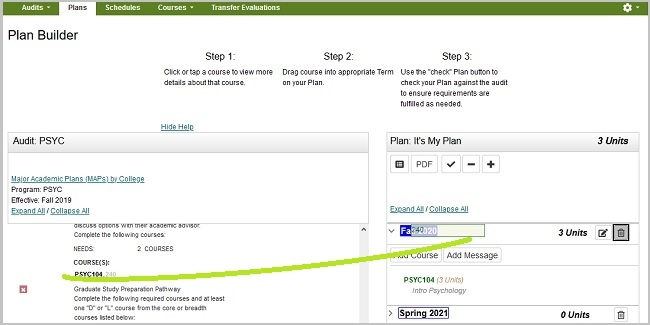
Drag & Drop
Add courses by dragging them from the Audit (left side) onto the term title (right side).
- “Grab” the course with your mouse.
- Drag it to the intended term. (The term will change color when you are in the “drop” zone.)
- Check that the course shows up in term list.
- Watch for an alert sign
 (circle with a minus sign) that indicates an issue. Hover the cursor over the circle will give you a hint. Click on the course for additional information.
If you need to change when you plan to take the course, just drag it to a different term.
- “Grab” the course with your mouse.
- Drag it to the new term. (The term will change color when you are in the “drop” zone)
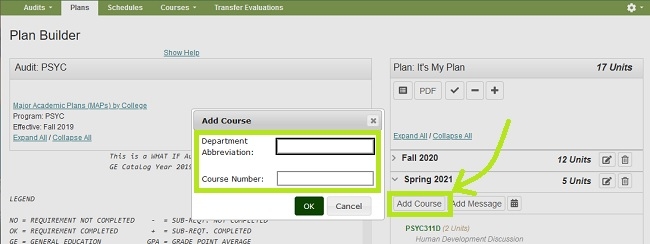
Add Manually
Some courses, such as electives, will not be in your audit. You will need to add them manually.
- Click the Add Courses button.
- Enter the Department Abbreviation (course prefix).
- Enter the Course Number.
- Click OK.
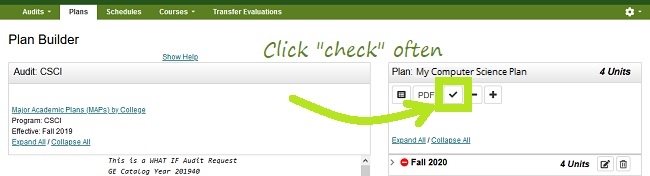
Click "check" often!
Click "check" often!
After you have added courses into your plan,
- Click the “check mark” located at the top of the plan. The audit on the left will update.
- Scroll down to the Major Requirements section of the audit.
- Check that the classes you added meet major requirements.
Areas satisfied by planned courses will have a purple box with a calendar. A red box with an X inside indicates an unfulfilled area.
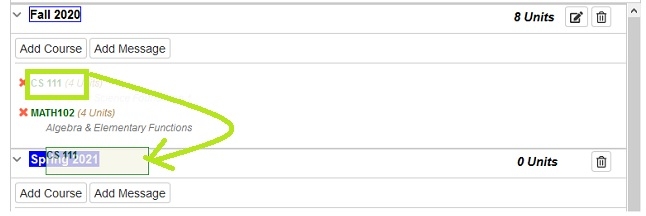
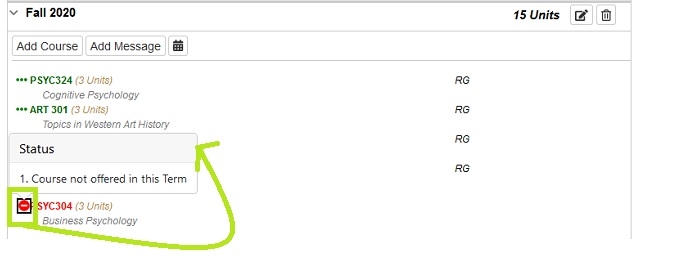
Check the plan side for alerts.
If a course displays a ![]() red circle with a minus sign it is an alert there may be an issue with planning this course. Hover your cursor over the circle for a hint: in this case, the course is not offered during this term.
red circle with a minus sign it is an alert there may be an issue with planning this course. Hover your cursor over the circle for a hint: in this case, the course is not offered during this term.
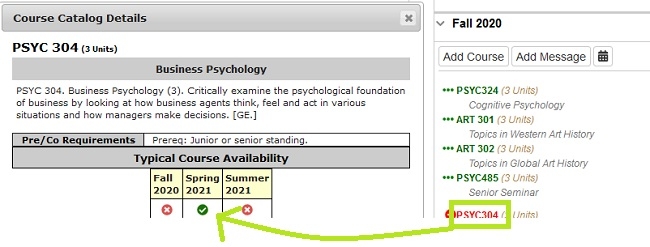
Click on the course for more details including, course description, prerequisites and availability grid. The availability grid shows the course will be offered in the Spring.
Mark preferred plan
Mark preferred plan
When you are happy with your plan, return to your Manage Plans screen and choose to make your new plan preferred—or just leave it as an option.
Click on a "star" to mark a plan as preferred.

If you want to try out some other options, copy your preferred plan, and then make changes to the copy.
- Click Plans in the toolbar,
- Next to your preferred starred plan click the Action drop-down menu.
- Click “Copy”.
- Give your new plan a name and you are ready to start planning!
If you decide you like the new plan better, click the star icon to mark it your preferred plan.
Beyond the Basics
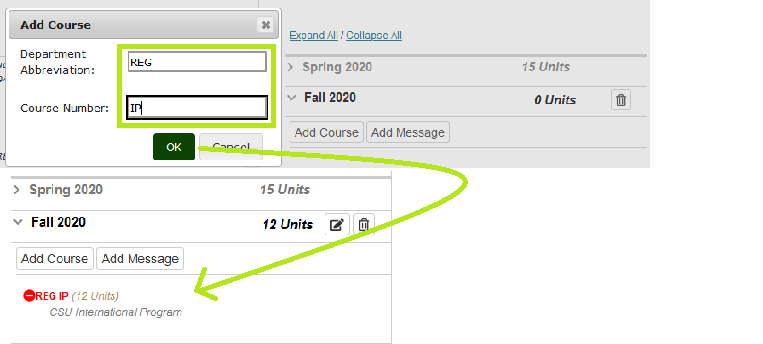
Add study abroad
Add study abroad
- Click the Add Course button under the term you plan to study abroad.
- Enter "REG" in Department Abbreviation.
- Enter "IP" in Course Number.
- Click OK.
This creates a 12-unit placeholder that tells Humboldt when you plan to study abroad. For more details on the study abroad application process, go to Study Abroad.
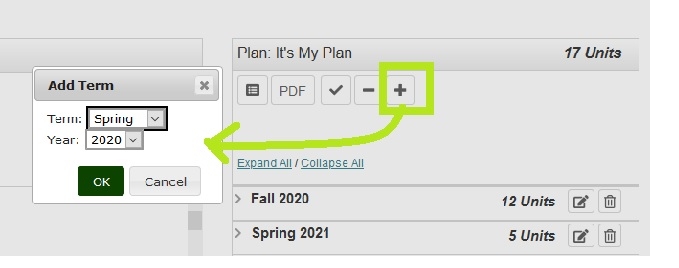
Add a term
Add a term
- Click the plus sign [+] under the plan title.
- Select the Term and Year you want to add.
- Click OK.
Create a "what-if" plan.
Create a "what-if" plan.
DARS Degree Planner allows you to create multiple plans to explore different major options - but keep in mind that each plan is tied to only one major (plus any declared minors) at a time. To create a new plan to explore another pathway, you can follow the steps in the Manage & Maintain Your Plan video. When exploring other plans, it’s important to keep your preferred plan "starred". Your preferred plan will be used by the university to predict course demand.
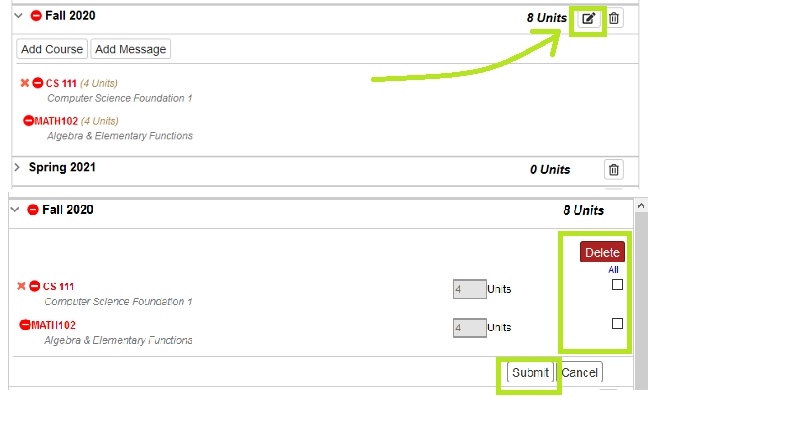
Delete a course
Delete a course
To delete an unwanted course from your plan:
Click the Edit button on the term line.
- Check the box to the right of the course to be deleted (or All to check/delete all courses in the term).
- Click Delete. (You will be prompted to confirm deletion.)
- Click Submit to save your changes.
Delete a plan
Delete a plan
You can delete optional plans, but not your preferred plan. If you have built a plan that you like better than your current preferred plan, click the star for the new plan to make it preferred.
- Click on Plans in the toolbar. find the plan you want to change.
- Select delete from the Action field.
Delete a term
Delete a term
- Click the trash can icon to the right of the term name.
- Click Yes to verify you want to delete the term and all courses within it.

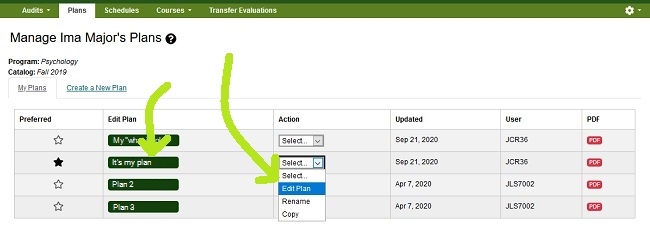
Work with an existing plan
Work with an existing plan
If your existing plan needs to change, make the updates as soon as you can. DARS Degree Planner works interactively in real time, so you can see how these changes will impact your overall plan. Discuss changes with your academic advisor.
Click on the plan name under Edit Plan or use the Action field to edit , rename, or copy a plan. Note you can not delete a plan that is marked as preferred.
Disclosure of Student Information
We take your privacy seriously. Read more about the Family Educational Rights and Privacy Act (FERPA).