


DARS Schedules Student User Guide
DARS Schedules takes the classes you added to your degree plan and generates potential schedules. Choose the schedule that fits your personal and professional life.
Already created your DARS Degree Plan for next semester - Great!
You're ready to use DARS Schedules.
Step 1: Click on the calendar icon to push the classes you plan on taking into DARS Schedules . Hint: The semester needs to be open to see the calendar icon. Click the toggle arrow to open.
![]()
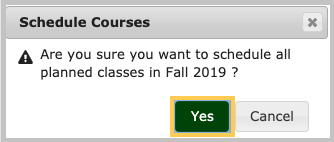
Step 2: On the Schedule Courses pop-up click the Yes button to confirm that you want to schedule all planned classes for the semester.
Step 3: You will see a message letting you know that the courses have been added to your cart. Click on the Busy Times button if you have times when you are NOT able to be in classes.
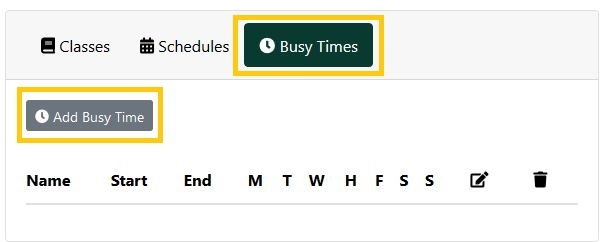
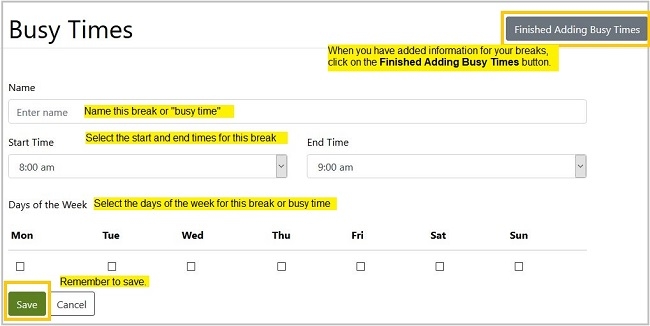
Step 4: Click on the Add Busy Times button to enter the times and days when you are NOT available to be in classes, such as work hours or a break for lunch. Hint: Click on save if you need to add another busy time.
Step 5: Click the Finished Adding Busy Times button when you are done entering information.
Step 6: Click the Schedules button.
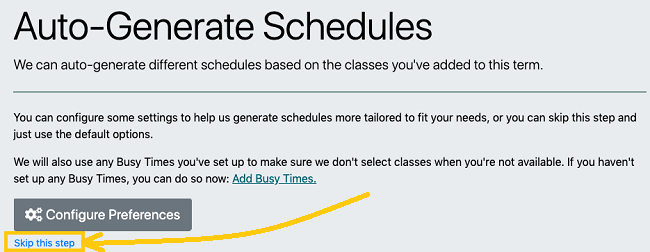
Step 7: Click the Auto-Generate button.
Step 8: To create schedule options now, click on Skip this step.
Hint: You have the option to add preferences, such as the times/days you want to be in class, preferred instructors, inclusion of classes with no open seats, and more. Learn how to add preferences to your DARS Scheduler.
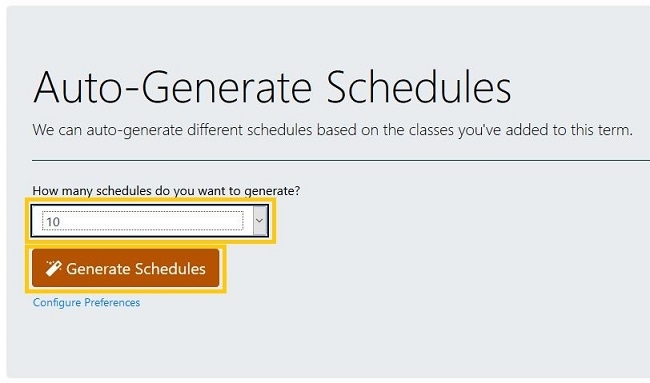
Step 9: Decide how many schedules you want DARS Scheduler to generate for your review. Click the Generate Schedules button.
Step 10: Review the schedules to make sure you see all your classes. If you have a preference for how a class meets (Face to Face, Hybrid, or Online), select a "Mode of Instruction" when you search the class schedule. Hint: Online courses that do not have set meeting times (Virtual Asynchronous) will be "hidden".
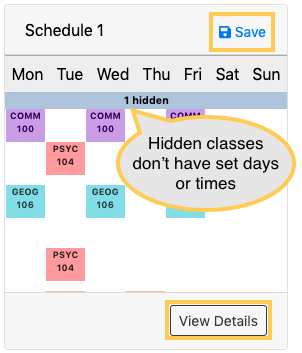
Step 11: Click on the View Details button to see more information.
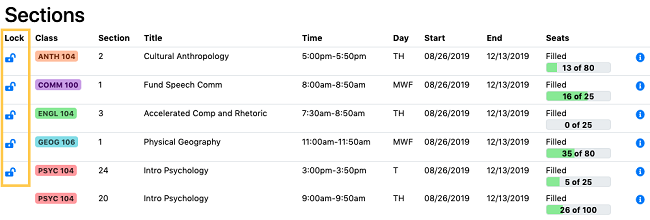
Hint: If there is a class section you definitely want to take, click the lock icon. You can later generate other schedules around your locked class sections.
Save your primary schedule.
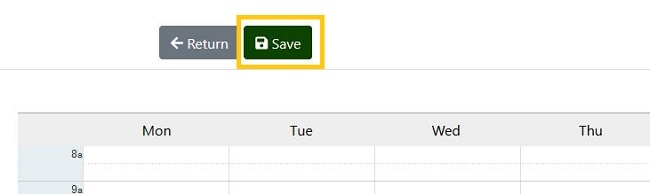
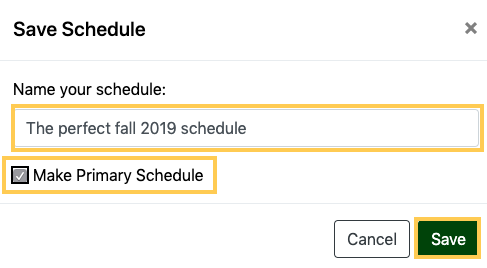
Step 12: When you find the best schedule, click on the Save button.
Step 13: You will see the Save Schedule pop-up window. Give your schedule a name, check the Make Primary Schedule checkbox and click on the Save button.
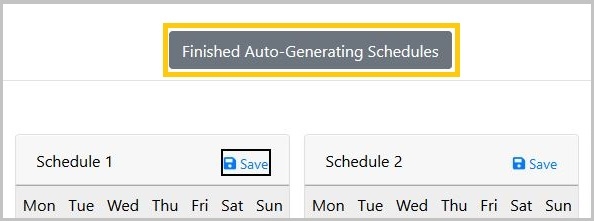
Step 14: If you are on the schedule details view, click the return button to go back to the schedules page. Click on the Finished Auto-Generating Schedules button at the top of the page.
Push you primary schedule into Student Center
Step 15: ONLY classes in your Primary Schedule can be added to your Student Center Shopping Cart (where you will complete your registration). Make sure that your preferred schedule appears in the Primary Schedule section as shown below.
Note: If you change your mind and decide to go with one of your backup schedules, click on the name of the backup schedule. The schedule details will display. Click the Make Primary button.
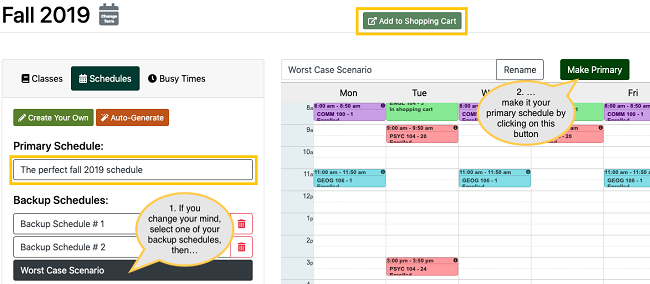
Step 16: Click the Add to Shopping Cart button to push your schedule from DARS Schedules into your Student Center Shopping Cart.
Step 17: After you pushed classes into your Student Center Shopping Cart and/or registered for other classes you can update your DARS Schedules with these classes by selecting the Sync w/ Student Cntr button
You will be redirected to your Student Center Shopping Cart.
Important: This is the last step in DARS Schedules, but you are not registered for classes. See Enroll in classes for the next steps in the process.
Caution: In some cases, after pushing your classes to the Student Center Shopping cart, the weekly/hourly view in DARS Schedules may no longer display all lab/lecture/activity components properly and in some cases the auto-generate feature may no longer recognize time conflicts.
After pushing your schedule to Student Center, if the schedule included any lab/activity/discussion sections, we recommend any additional edits to your schedule be completed within Student Center using the class search feature to avoid confusion. Contact the Office of the Registrar if you have any questions at records@humboldt.edu
Disclosure of Student Information
We take your privacy seriously. Read more about the Family Educational Rights and Privacy Act (FERPA).